

I’ve been thinking of making these little tartlets for a while. I used to make them a lot, using a recipe from an old Katie Stewart book – Entertaining with Katie Stewart – which was published in 1990. I’ve written about Katie before: she was my ‘kitchen guru’ even before Delia Smith came on to the scene. I find that while a number of my old cookery books are past their time in terms of the type of recipes I want to cook nowadays, there are a few I turn to for classic recipes – like this one, which shows you how to make home-made flaky pastry.
Two things spurred me on today: a conversation with a friend and seeing these little tarts in Paul Bakery the other day and remembering I used to make them myself. Christine, a friend from book group, asked me just before Christmas (when we were all thinking ‘mince pies‘) if I make my own pastry. I said I always make my own shortcrust pastry – and like her, usually by hand and not using a food processor – but I bought puff and filo pastry. Then I mentioned the flaky pastry and this recipe, which inspired me to think I really should look it out!
I measured it all out in Imperial measurements – ounces and pints – as I know that’s how it would have originally been made all those years ago, but give the metric equivalent that’s in the book. Don’t try to mix the two.
Apple Tartlets with Flaky Pastry (makes 6)
Flaky Pastry
- 8oz (225g) strong white flour
- pinch salt
- 6oz (175g) butter (50z well chilled; 1oz soft)
- ¼ pint (150ml) cold water
- 2 teaspoons lemon juice
Topping
- 3 dessert apples
- beaten egg, to glaze
- icing sugar, for dusting
There are 2 x 30 minutes of chilling the pastry as you make these, so the pastry needs to be prepared in advance or maybe even the day before. Katie likes to serve the final tartlet hot with chilled cream but I made mine in advance so they were served at room temperature. I’m sure hot is nice but cool is good too!
First of all, sift the flour into a large bowl with the pinch of salt. I put a sieve over the bowl and lay it on digital scales, then when I’ve got the right amount of flour can just finishing sifting into the bowl.

Now rub in the 1oz of soft butter gently. The remaining butter must be well chilled. I took mine from the fridge and put it in the freezer for about 10-15 minutes before I started cooking. I didn’t weigh out the amount I needed as I wanted to hold it with its wrapping just peeled back and keep it as cold as possible while I grated it into the flour. Thus, I put the bowl on the scales again, reset to zero, and watched as I grated until I reached 5oz. You also need to occasionally dip the butter in flour as you grate to keep pieces separate.


Once you’ve finished grating the butter, very carefully and gently mix it all together with your hands, lifting it as you go to let in air and not pressing any of it together. You just need to get the butter pieces covered in flour as much as you can.


Measure the water and add the lemon juice. Pour into the flour mixture and carefully combine with a knife. As soon as it comes together, with floured hands pull into a ball and put on a floured work surface.


Do not knead but shape gently into a rectangle and then roll it out so that it’s three times as long as wide. Then fold the top third over the centre, then the bottom third over those two sections.


Press the open ends together then turn 90 degrees and repeat the process. Fold in the same way then wrap in cling film and put in the fridge for a minimum of 30 minutes. After that time, repeat the whole process, rolling and folding twice, then wrap again and put back in the fridge for at least another 30 minutes.
Now the pastry is ready to use. Heat the oven to 200C/180 fan/Gas 6.
On a floured work surface, roll the pastry out to a rectangle of 12 x 8 inches (30 x 20 cm). It will be quite thick; about ¼ inch (5mm). Use a cutter 4 inches (10 cm) in diameter to cut out 6 circles of pastry. (My pastry cutter was too small and I improvised by using a mug that was exactly the right size.)


Lay them on a greased baking tray. I dusted the bottom of each circle with a little flour for easy lifting when cooked. I also – not in Katie’s instructions – cut a shallow circle with a sharp knife just into the pastry, a little over ¼ inch (5mm) from the edge to allow the edge of the pastry to rise more easily during cooking.

Now prepare the apples. You want fairly small dessert apples – large ones won’t fit the pastry circles. Take the core out (rummaging in a kitchen drawer I managed to find a very old corer I knew I had somewhere!). Then, using a sharp vegetable peeler, peel the skin from the apples. Cut in half lengthways.

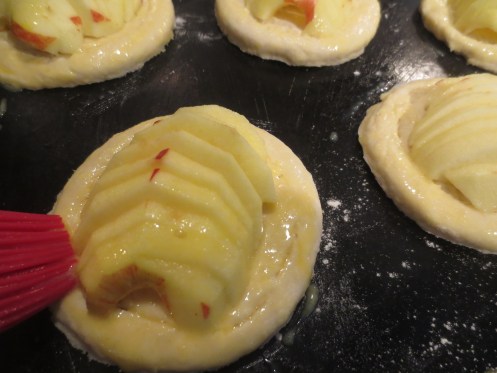
Carefully slice each half, fairly thickly, holding the shape in place. Carefully transfer to the centre of a pastry circle and fan out slightly. Repeat with each apple half. Then brush the edges of the pastry circles with a beaten egg. Put in the preheated oven for about 30 minutes (I checked after 20 minutes as I was using a fan oven but they needed another 5 minutes. But best to check – I didn’t want to ruin them after all that careful pastry making!).
They should be golden brown but don’t cook too much as they are going to go under a grill for a final stage. Sprinkle each tartlet with a good showering of icing sugar.

Put under a hot grill until caramelised.

Watch carefully – you don’t want to burn them at this stage and it will only take a couple of minutes to brown them.
They look pretty impressive, I think. Great for entertaining and always nice to be able to serve individual desserts. I think they look more enticing too. You could serve them immediately with some cream or ice cream but I made ours in advance. I guess you could warm them later but I thought they’d be fine cool.

It’s a great pastry; lovely with the apples but you could try other fruit, like plums or pears – fruit that cooks well. It’s not as light and flaky as puff pastry, of course, but much lighter than a shortcrust and it works so well with this kind of dessert. I’ll definitely be making it more often now I’ve revisited it after a few years’ break.
Never seen anyone grate the butter for making flaky pastry. Good idea, the tarts look tasty.
Thank you. The grating seems to work well 🙂
This looks like a great recipe for pastry. I would like to try it.
So simple and yet so beautiful! Bravo!
Thank you, Mimi! 🙂